Configuration
[TOC]
The Configuration area controls how Edocman stores, uploads, downloads, and displays documents on your Joomla site. It manages storage paths, file permissions, email notifications, viewing methods, layout themes, SEO-friendly URLs, custom CSS, AI integration, and extension updates.
Administrators should review these settings carefully before publishing documents to users. Some settings affect security, user permissions, and file availability. Incorrect configuration can prevent uploads, downloads, or document viewing.
This page explains each configuration option and provides practical recommendations.
General
The General tab configures the core settings for your Edocman installation. These options control storage paths, document permissions, library dependencies, and multilingual support.
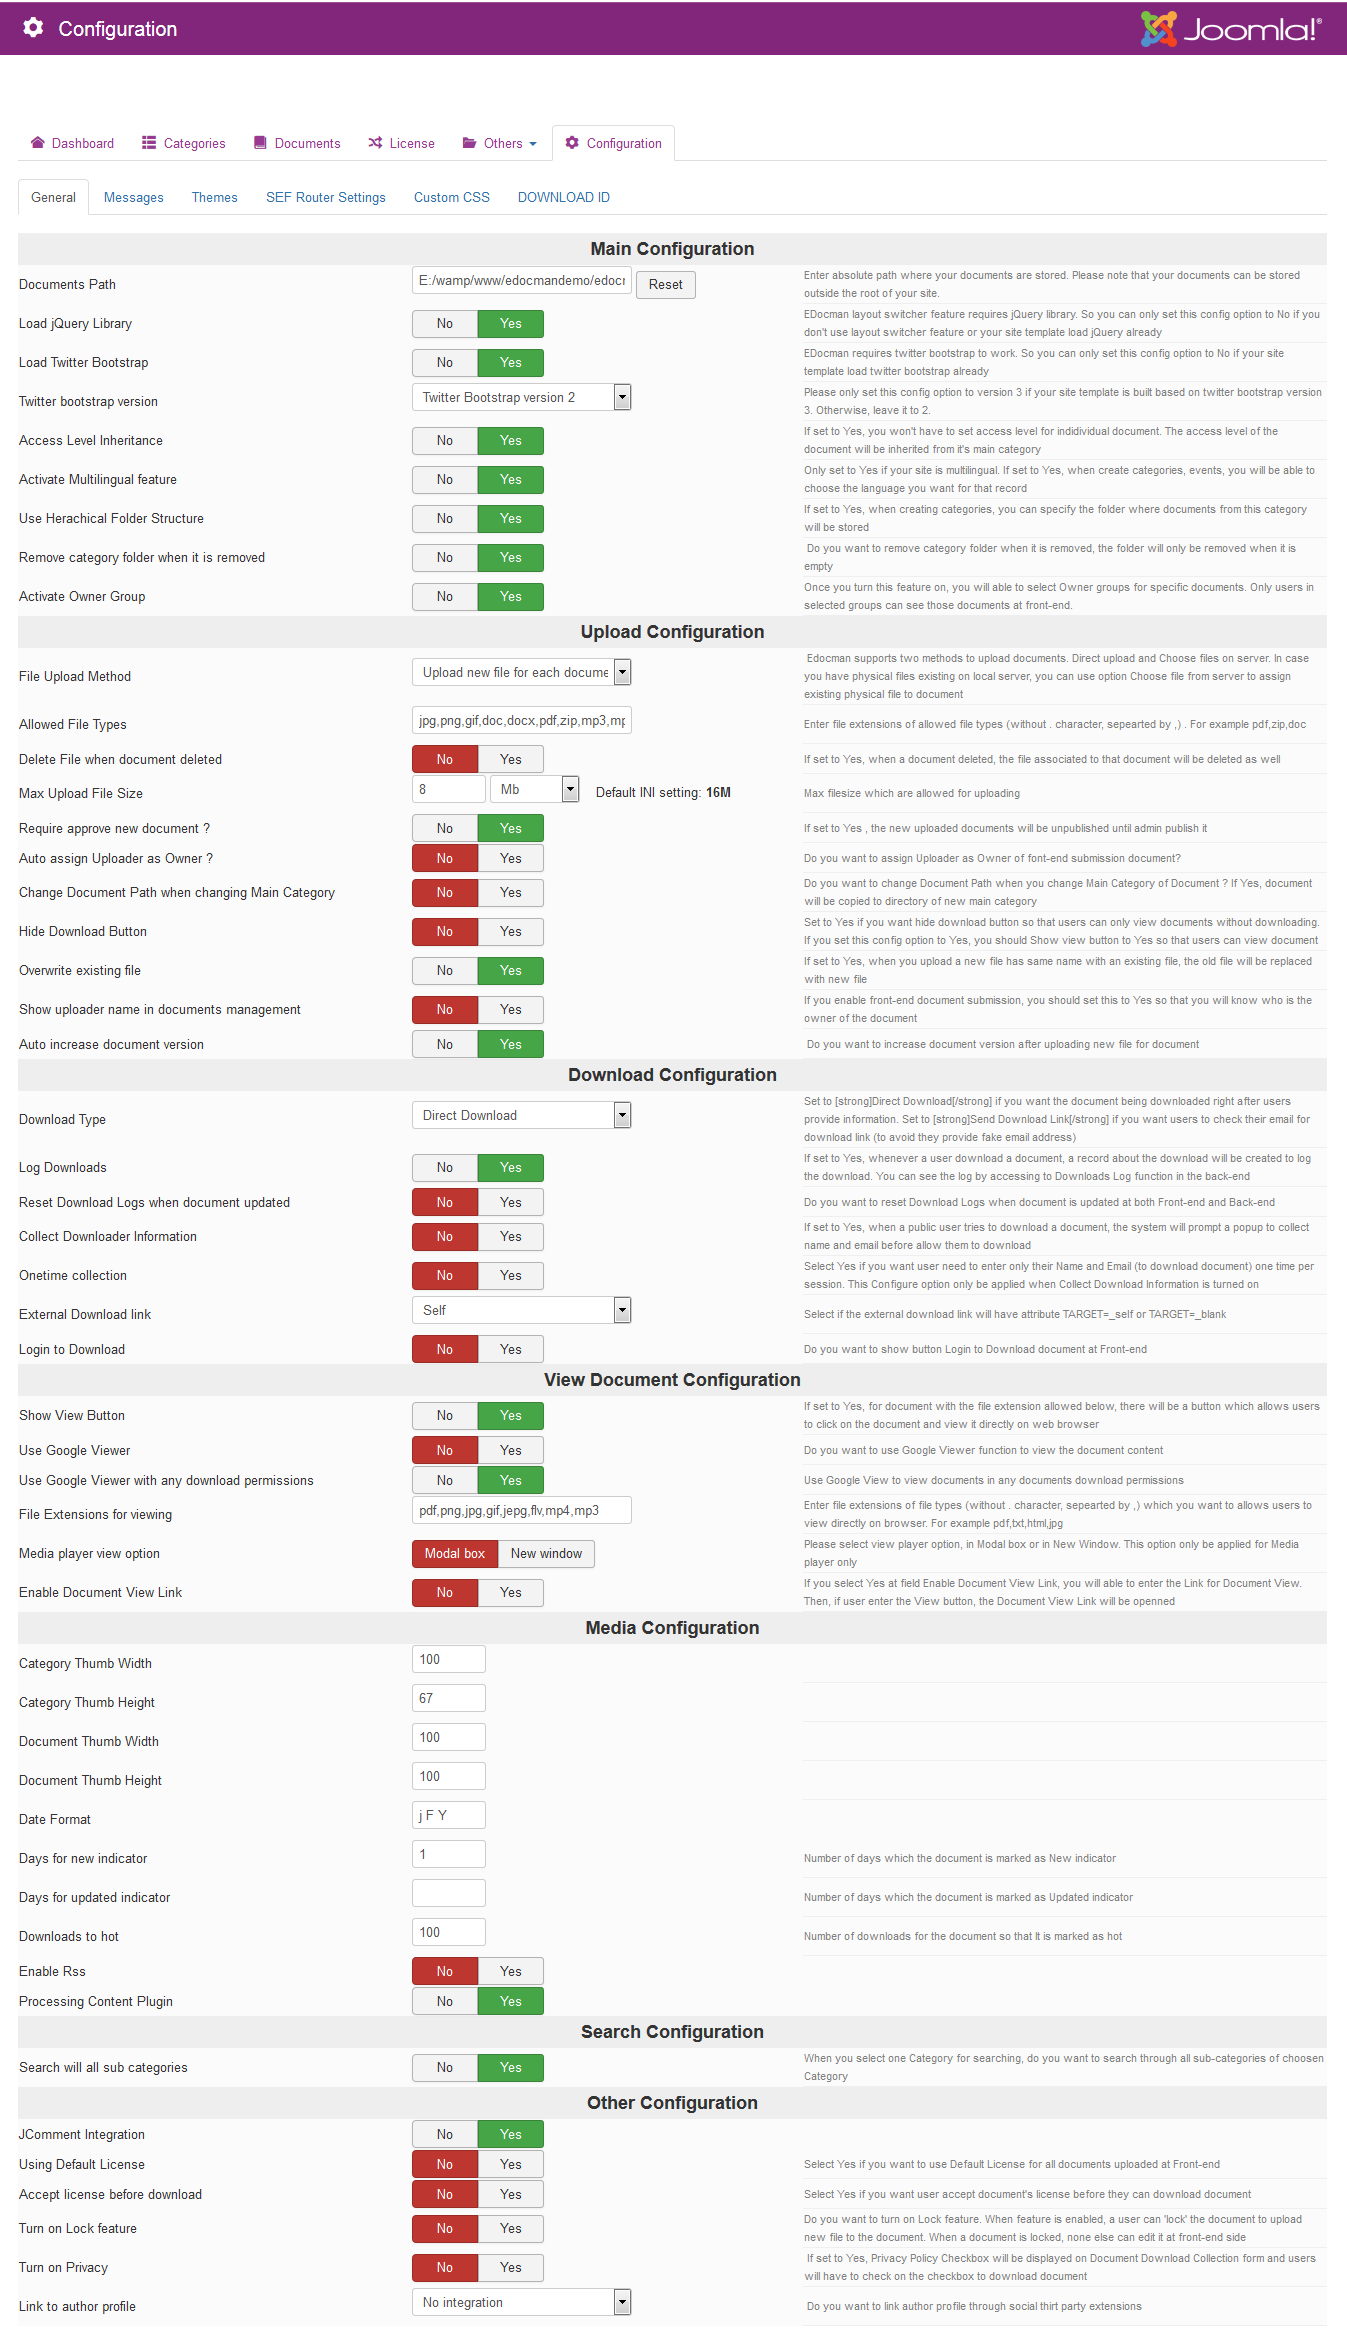
Main Configuration
Documents Path
Enter the absolute server path where documents are stored.
- Documents can be stored outside the web root for better security.
- The path must be writable by the web server.
- Wrong paths cause upload, download, or viewing failures.
- Example:
/home/username/public_html/edocman_files(depends on your hosting environment). - Recommended: Store documents outside the web root when possible to prevent direct URL access.
Load jQuery Library
The Edocman layout switcher feature requires the jQuery library.
- When enabled: Edocman loads jQuery automatically.
- When disabled: Edocman does not load jQuery. Use this if your Joomla template already loads jQuery or if you do not use the layout switcher.
- Recommended: Set to No if your template already loads jQuery.
Load Bootstrap CSS
Edocman uses Bootstrap styles for front-end display.
- When enabled: Edocman loads its Bootstrap CSS file.
- When disabled: Edocman does not load Bootstrap CSS. Use this if your template already includes the required Bootstrap version.
- Recommended: Set to No if your template already loads Bootstrap. Set to Yes if Edocman layouts are not styled correctly.
Twitter Bootstrap Version
Select the Bootstrap version used by your Joomla template.
- Available versions: 2, 3, 4, or 5.
- Recommended: Match this setting to your template's Bootstrap version. Leave it at 2 if your template does not use Bootstrap 3, 4, or 5.
Show Update Available
When a new Edocman version is available, the system shows an update notice in the Dashboard.
- When enabled: Update notices are displayed to administrators.
- When disabled: Update notices are hidden.
- Recommended: Leave enabled to stay informed about updates.
Access Level Inheritance
Documents can inherit their access level from their main category.
- When enabled: Documents automatically inherit the access level of their main category. You do not need to set access level for each document individually.
- When disabled: Access level must be set manually for each document.
- Example: If a category has "Registered" access, all documents in that category inherit "Registered" access automatically.
- Recommended: Set to Yes for category-based permission sites. This reduces manual work and helps maintain consistent permissions.
- Note: Changing the category's access level affects all documents in that category when inheritance is enabled.
Activate Multilingual Feature
Enable this option only if your Joomla site is multilingual.
- When enabled: You can assign a language to each category and document when creating or editing them.
- When disabled: All categories and documents are available in all languages.
- Recommended: Set to Yes only if your site uses Joomla's multilingual features.
Activate Owner Groups
Owner groups restrict which users can view specific documents.
- When enabled: You can assign owner groups to documents. Only users in the selected groups can view those documents on the front-end.
- When disabled: Owner groups are not available. Document access is controlled by Joomla access levels only.
- Example: Create a private document library for a department or client group by assigning them as owners.
- Recommended: Enable this when you need to restrict documents to specific user groups beyond Joomla access levels.
- Note: Owner groups work differently from Joomla access levels. Owner groups filter visible documents based on user membership.
Categories Configuration
Use Hierarchical Folder Structure
Documents are stored in folders based on their categories.
- When enabled: You can specify a folder name for each category when creating categories. Documents in that category are stored in the corresponding folder.
- When disabled: All documents are stored in the main Documents Path folder.
- Example: A category named "Financial Reports" can store its documents in a folder named
financial_reports. - Recommended: Enable this for organized file storage when managing many categories.
- Note: Moving documents between categories may require manual file path updates if this option is enabled. See also "Change Document Path when changing Main Category" in Upload Configuration.
Remove Category Folder when it is Removed
This option removes the document directory of a category when the category is deleted.
- When enabled: Deleting a category removes its folder and all files inside.
- When disabled: The folder and files remain on the server after the category is deleted.
- Note: This option only applies when "Use Hierarchical Folder Structure" is enabled.
- Recommended: Enable with caution. Ensure backups exist before deleting categories with important files.
Force Category Folder to Lowercase
Force all category folder names to lowercase.
- When enabled: Category folder names are converted to lowercase automatically.
- When disabled: Folder names match the category name exactly.
- Recommended: Enable this for consistent file paths and to avoid case-sensitivity issues on some servers.
Inheritance Parent Category Owners
Sub-categories inherit owner users and owner groups from their parent categories.
- When enabled: Sub-categories automatically inherit the owners and owner groups of their main categories.
- When disabled: Owners must be set manually for each sub-category.
- Recommended: Enable this to simplify permission management in hierarchical category structures.
Upload Configuration
File Upload Method
Edocman supports two methods to upload documents.
- Direct Upload: Users upload files directly from their computer.
- Choose from Server: Users select files already uploaded to the server.
- Recommended: Use Direct Upload for most sites. Use Choose from Server only when documents are pre-uploaded via FTP or another method.
Allowed File Types
Enter the file extensions allowed for upload in Edocman.
- Separate multiple extensions with commas.
- Example:
pdf,doc,docx,xls,xlsx,ppt,pptx,txt,zip - Recommended: Allow only file types your users need. Restrict executable file types for security.
- Note: File types not listed here will be rejected during upload.
Delete File when Document Deleted
When a document is deleted, the associated file is deleted as well.
- When enabled: Deleting a document deletes its file from the server.
- When disabled: Deleting a document leaves the file on the server.
- Recommended: Enable this to avoid unused files accumulating on the server.
Delete Existing File when Upload New One
When uploading a replacement file, the existing physical file is deleted.
- When enabled: The old file is deleted when you upload a new file for the same document.
- When disabled: The old file remains on the server.
- Note: This option applies to local storage only.
- Recommended: Enable this to save disk space.
Max Upload File Size
Maximum file size allowed for uploads (in megabytes).
- This setting is limited by PHP configuration on your hosting server.
- Ensure this value is lower than the PHP
upload_max_filesizeandpost_max_sizesettings. - Example: If PHP allows 8MB, set this to 8 or lower.
- Recommended: Check your hosting limits and set a realistic maximum. If users report upload failures, check the PHP limits on your server.
Require Approve New Document
Newly uploaded documents remain unpublished until an administrator approves them.
- When enabled: Front-end document submissions are created as unpublished. Administrators must manually publish them.
- When disabled: Newly uploaded documents are published immediately.
- Recommended: Enable this for public document submission forms to review documents before they go live.
Inheritance Category Owners
New documents inherit the owners of their category.
- When enabled: Documents automatically inherit the owners assigned to their category.
- When disabled: Owners must be assigned manually to each document.
- Recommended: Enable this when using owner groups to simplify permission management.
Auto Assign Uploader as Owner
The user who uploads a document on the front-end is assigned as its owner.
- When enabled: The uploader becomes the owner and the only user who can view the document on the front-end (unless other owners are also assigned).
- When disabled: Owners must be assigned manually.
- Recommended: Enable this for personal document storage. Disable this for public document libraries.
Change Document Path when changing Main Category
When "Use Hierarchical Folder Structure" is enabled, this option moves the document file automatically when the document's category changes.
- When enabled: Changing the document's category moves its file to the new category folder.
- When disabled: The file remains in the original category folder even if the category changes.
- Recommended: Enable this to keep folder structure consistent with document categories.
- Note: This option only applies when "Use Hierarchical Folder Structure" is enabled.
Overwrite Existing File
A newly uploaded file with the same name as an existing file replaces the old file.
- When enabled: Files with duplicate names overwrite existing files.
- When disabled: A unique number is added to the file name to avoid overwriting.
- Recommended: Disable this to prevent accidental file overwrites. Enable only if you intentionally want to replace files.
Hide Download Button
Hide the download button so users can view documents without downloading them.
- When enabled: The download button is hidden. Users can only view documents.
- When disabled: The download button is visible.
- Recommended: Enable this when you want to restrict file downloads but allow in-browser viewing. If you enable this option, also enable "Show View Button" so users can still open the document.
- Note: This does not prevent technically skilled users from downloading files through browser tools or direct URLs.
Auto Increase Document Version
The document version is increased automatically after a new file is uploaded.
- When enabled: Uploading a new file increments the version number.
- When disabled: Version numbers must be updated manually.
- Recommended: Enable this to track file revisions automatically.
Position of Unique Number
If you do not overwrite existing files, a unique number is added to the file name. Choose where the number is added.
- Before: The number is added before the file name. Example:
1_document.pdf - After: The number is added after the file name. Example:
document_1.pdf - Recommended: Choose based on your file naming preference.
Show Uploader Name in Documents Management
Display the uploader's name in the back-end document management screen.
- When enabled: Administrators can see who uploaded each document.
- When disabled: Uploader information is not displayed.
- Recommended: Enable this when front-end document submission is allowed.
Redirect after Uploading
Select the page where users are redirected after uploading a document from the front-end.
- Choose a menu item or leave blank to stay on the same page.
- Recommended: Redirect to a confirmation or thank-you page.
Make Filename Safely
Remove non-UTF8 characters from file names.
- When enabled: File names are sanitized to remove special characters, spaces, and non-English characters.
- When disabled: File names are kept as uploaded.
- Recommended: Enable this to avoid file name issues on some servers and operating systems.
Use Human Readable Titles
Use human-readable titles for documents created through Batch Upload and Bulk Import tools.
- When enabled: Document titles are generated from file names by replacing underscores and hyphens with spaces and capitalizing words.
- When disabled: Document titles match file names exactly.
- Recommended: Enable this to create user-friendly document titles automatically.
Download Configuration
Log Downloads
Each document download is recorded in the back-end Download Logs screen.
- When enabled: Every download is logged with user information, timestamp, and document name.
- When disabled: Downloads are not logged.
- Recommended: Enable this if you need download reporting and analytics.
Reset Download Logs when Document Updated
Download logs are cleared whenever a document is updated.
- When enabled: Updating a document from the front-end or back-end clears its download log history.
- When disabled: Download logs are preserved when documents are updated.
- Recommended: Disable this to maintain complete download history.
Collect Downloader Information
Public users must enter their name and email before downloading a document.
- When enabled: Users see a form requesting their name and email address before the download begins.
- When disabled: Downloads start immediately without collecting user information.
- Recommended: Enable this when you need visitor contact information for lead generation or compliance. Disable this for public document libraries where friction reduces user experience.
- Note: This may reduce downloads due to the extra step.
Onetime Collection
Users need to enter their name and email only once per session.
- When enabled: After the first download, users do not need to re-enter their information during the same session.
- When disabled: Users must enter information for every download.
- Note: This option only applies when "Collect Downloader Information" is enabled.
- Recommended: Enable this to improve user experience while still collecting contact information.
Download Type
Choose how downloads are delivered after the user submits their information.
- Direct Download: The download starts immediately.
- Send Download Link: A download link is emailed to the user instead.
- Recommended: Use Direct Download for immediate access. Use Send Download Link to verify email addresses or deliver files later.
External Download Link
Select whether external download links open in the same tab or a new tab.
- self: Opens in the same browser tab.
- blank: Opens in a new browser tab.
- Recommended: Use blank to keep your site open in the original tab.
Login to Download
When a document requires Registered access, non-logged-in users see a Login button instead of the Download button.
- When enabled: Users must log in before downloading restricted documents.
- When disabled: Non-logged-in users cannot download restricted documents and do not see the login prompt.
- Recommended: Enable this for membership sites where document access is restricted to registered users.
Select Login Option
Choose which login form is displayed to users.
- Edocman Login Form: Uses the built-in Edocman login form.
- Joomla Login: Redirects users to the Joomla login page.
- Recommended: Use Joomla Login to maintain consistent branding and single sign-on behavior.
Enable Mass Download
Users can add documents to a Mass Download list and download selected items as a ZIP file.
- When enabled: A Mass Download button is available on the front-end.
- When disabled: Mass Download is not available.
- Note: This works only when documents are stored on the local server.
- Recommended: Enable this when users need to download multiple documents at once.
View Document Configuration
This section controls how documents are viewed in the browser. Understanding the difference between viewing and downloading is important for managing document access.
Viewing vs. Downloading
- View button: Opens a supported document in the browser or viewer without downloading the file to the user's computer.
- Download button: Downloads the file directly to the user's computer.
- Viewing does not necessarily grant download permission, depending on configuration.
- Some file types can be opened directly by the browser, such as PDF, images, text, or HTML.
- Office files (DOC, DOCX, XLS, XLSX, PPT, PPTX) may need Google Viewer or another viewer method.
Show View Button
Documents with supported file extensions display a View button for in-browser viewing.
- When enabled: Users see a View button for documents with extensions listed in "File Extensions for viewing".
- When disabled: The View button is not displayed. Users can only download documents.
- Recommended: Enable this to allow in-browser previews for supported file types.
Use Google Viewer
Documents can be viewed through Google Viewer.
- When enabled: Edocman uses Google Docs Viewer to display documents in the browser.
- When disabled: Documents are displayed directly by the browser if supported.
- Note: Google Viewer generally requires the document URL to be publicly reachable by Google servers. Private or protected files may not work unless "Use Google Viewer with any download permissions" is enabled.
- Recommended: Enable this for office documents (DOC, XLS, PPT) that cannot be displayed natively by browsers. Disable this if documents are private and cannot be accessed by Google servers.
- Note: In some cases, the browser may need to be refreshed after the file has fully loaded.
Use Google Viewer with any Download Permissions
Google Viewer can open documents even when the document is not publicly viewable.
- When enabled: Google Viewer is used regardless of document access permissions.
- When disabled: Google Viewer only works for publicly accessible documents.
- Note: This option may expose document URLs to Google servers even when documents have restricted access.
- Recommended: Use with caution. Enabling this may have privacy implications for restricted documents.
File Extensions for Viewing
Enter the file extensions that users can view directly in the browser.
- Separate multiple extensions with commas.
- Example:
pdf,txt,html,jpg,jpeg,png,gif,mp4,mp3 - Recommended: Include file types that browsers can display natively, such as PDF, images, text, and HTML. Add office file extensions (doc, docx, xls, xlsx, ppt, pptx) only if you enable Google Viewer.
- Note: Users cannot view documents with extensions not listed here.
Media Player View Option
Select where media files (audio and video) are displayed when viewed.
- Modal Box: Opens the media player in a popup overlay.
- New Window: Opens the media player in a new browser window or tab.
- Note: This option applies to media player only.
- Recommended: Use Modal Box for a smoother user experience.
Enable Document View Link
The View button opens a custom document-view URL instead of the file location.
- When enabled: The View button links to a custom URL that you configure separately.
- When disabled: The View button opens the actual file or uses Google Viewer.
- Recommended: Disable this unless you have a specific custom viewer implementation.
Troubleshooting Document Viewing
If a document does not display when the View button is clicked, check the following:
- File extension is included in "File Extensions for viewing": The file type must be listed in this setting.
- "Show View Button" is enabled: Without this option, the View button does not appear.
- File exists on the server: Verify the file path is correct and the file has not been deleted.
- Document access permission allows the user to open it: Check Joomla access levels and owner groups.
- Browser supports the file type: Not all file types can be displayed in all browsers.
- Google Viewer can access the file URL: If using Google Viewer, ensure the document URL is reachable by Google servers. Private, password-protected, or localhost URLs will not work with Google Viewer unless "Use Google Viewer with any download permissions" is enabled.
Practical Examples
-
Preview PDF files but control downloads: Enable "Show View Button" and add
pdfto "File Extensions for viewing". Disable "Use Google Viewer". Set "Hide Download Button" to Yes to prevent downloads. -
Disable preview and only allow downloads: Disable "Show View Button". Users can only download files, not view them in the browser.
-
Allow public preview for public documents: Enable "Show View Button", add supported extensions, and enable "Use Google Viewer" for office files. Ensure documents have Public access level.
-
Use viewing for images and PDFs only: Add only
pdf,jpg,jpeg,png,gifto "File Extensions for viewing". Other file types will only show the Download button.
Search Configuration
Search will all Sub-categories
When a category is used as the search scope, all of its subcategories are included in the search.
- When enabled: Searching within a category searches all subcategories as well.
- When disabled: Search results include only the selected category.
- Recommended: Enable this for comprehensive search results.
Save Search Terms
User search terms are stored for reporting and tag analysis.
- When enabled: Search terms are saved in the database for analysis.
- When disabled: Search terms are not stored.
- Note: Enabling this increases database usage slightly.
- Recommended: Enable this if you need search analytics.
Exclude Categories
Enter the category IDs that you want to exclude from search results.
- Separate multiple category IDs with commas.
- Example:
5,12,18 - Recommended: Exclude categories containing archived, draft, or internal documents that should not appear in search results.
Media Configuration
Category Thumb Height
Set the height in pixels for category thumbnail images.
- Example:
200 - Recommended: Match this to your site layout and design.
Category Thumb Width
Set the width in pixels for category thumbnail images.
- Example:
200 - Recommended: Use consistent dimensions for a professional appearance.
Document Thumb Height
Set the height in pixels for document thumbnail images.
- Example:
150 - Recommended: Match this to your site layout and design.
Document Thumb Width
Set the width in pixels for document thumbnail images.
- Example:
150 - Recommended: Use consistent dimensions for a professional appearance.
Date Format
Set the date format used on the Edocman front-end.
- Example:
Y-m-dfor 2026-08-07,F j, Yfor August 7, 2026 - Recommended: Match your site's standard date format or regional preferences.
Days for New
Set how many days a document is marked as New.
- Example:
7(documents uploaded within the last 7 days are marked as New) - Recommended: Use 7 to 14 days depending on how frequently documents are published.
Downloads to Hot
Set the download threshold used to mark a document as Hot.
- Example:
100(documents with 100 or more downloads are marked as Hot) - Recommended: Adjust based on your site's typical download volume.
Enable RSS
Publish an RSS feed of new documents on the front-end.
- When enabled: An RSS feed is available for users to subscribe to.
- When disabled: No RSS feed is published.
- Recommended: Enable this only if your site actively uses RSS feeds. Most modern sites do not require RSS.
Processing Content Plugin
Process Joomla content plugins inside document and category descriptions.
- When enabled: Joomla content plugins are processed in descriptions, allowing shortcodes and plugin content to work.
- When disabled: Plugin content is not processed.
- Recommended: Enable this if you use content plugins in document descriptions.
Other Configuration
Using Default License
Apply the default license to all documents uploaded on the front-end.
- When enabled: Documents uploaded from the front-end automatically use the default license.
- When disabled: License must be selected manually during upload.
- Recommended: Enable this for sites with a standard licensing policy.
Accept License before Download
Require users to accept the document license before downloading it.
- When enabled: Users must check a box confirming they accept the license terms before downloading.
- When disabled: Documents are downloaded without license acceptance.
- Recommended: Enable this for legally binding license agreements.
Turn on Lock Feature
A user can lock a document while updating its file. A locked document cannot be edited by other front-end users.
- When enabled: Users can lock documents during editing.
- When disabled: Lock feature is not available.
- Recommended: Enable this for collaborative environments where multiple users edit documents.
Turn on Privacy
Show a privacy-policy checkbox on the download collection form.
- When enabled: Users must accept the privacy policy before entering their information to download documents.
- When disabled: No privacy checkbox is displayed.
- Recommended: Enable this to comply with privacy regulations such as GDPR.
Link to Author Profile
Link the author name to a profile page from a third-party extension.
- When enabled: Author names link to profile pages from extensions such as Community Builder or JomSocial.
- When disabled: Author names are plain text.
- Recommended: Enable this if you use a community extension and want to display author profiles.
Enable Rating
Allow logged-in users to rate documents.
- When enabled: Users can rate documents with a star rating system.
- When disabled: Rating is not available.
- Recommended: Enable this for community sites where user feedback is valuable.
CSV Separator
Choose whether imported CSV files use a semicolon or comma separator.
- Semicolon (
;): Common in European CSV files. - Comma (
,): Common in US and international CSV files. - Recommended: Match the format of your CSV files.
Change Expired Document Status to Archive
Move expired documents to the Archive state automatically.
- When enabled: Documents past their expiration date are archived automatically.
- When disabled: Expired documents remain published until manually changed.
- Recommended: Enable this for automated document lifecycle management.
Hide Documents from Search Engines
Discourage search engines such as Google and Bing from indexing document pages.
- When enabled: A
noindexmeta tag is added to document pages. - When disabled: Document pages can be indexed by search engines.
- Recommended: Enable this for private or internal document libraries. Disable this for public document libraries that should be indexed and appear in search results.
Messages
The Messages tab manages email templates and notification messages used by Edocman. These emails notify administrators and users about document uploads, downloads, and assignments.
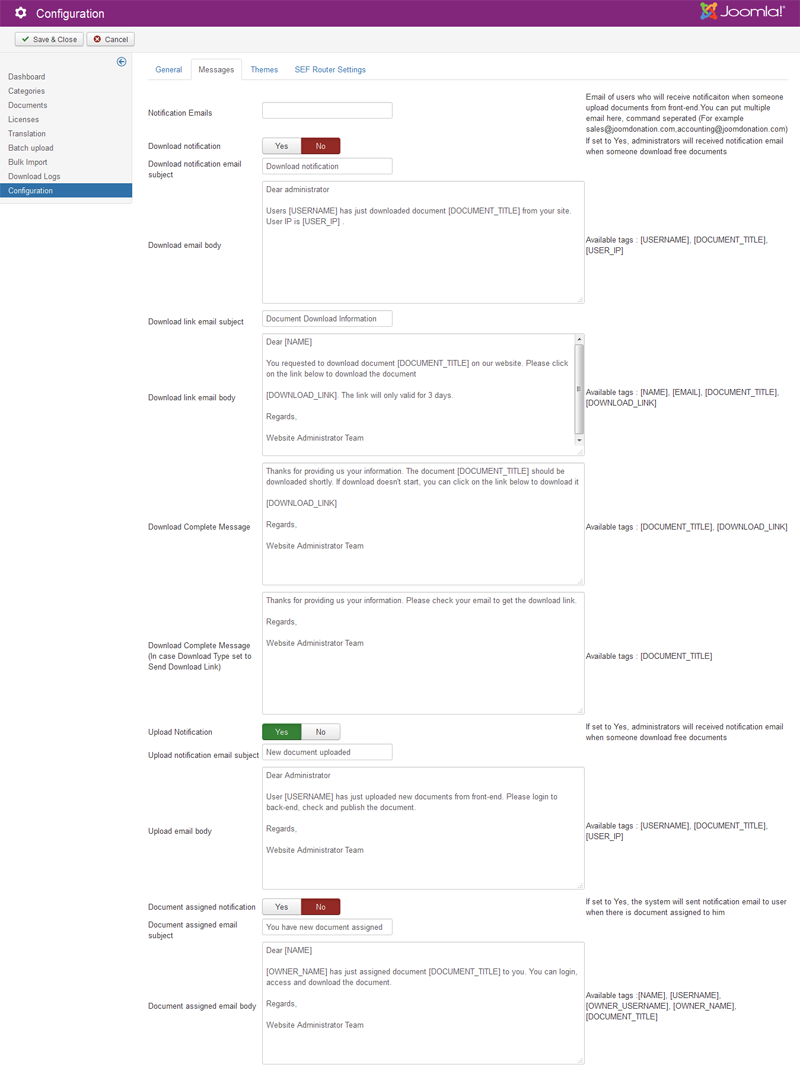
Download Emails
Notification Emails
Email addresses of users who will receive notification when someone uploads documents from the front-end.
- You can enter multiple email addresses, separated by commas.
- Example:
sales@joomdonation.com,accounting@joomdonation.com - Recommended: Include administrator or moderator email addresses.
Download Notification
Administrators receive notification email when someone downloads free documents.
- When enabled: Administrators are notified via email each time a free document is downloaded.
- When disabled: No download notifications are sent.
- Recommended: Enable this only if download monitoring is necessary, as it can generate many emails on busy sites.
Download Notification Email Subject
Enter the subject line for download notification emails.
- Example:
Document Downloaded: [DOCUMENT_TITLE]
Download Email Body
Enter the body text for download notification emails.
- Available tags:
[USERNAME],[DOCUMENT_TITLE],[USER_IP] - Example:
User [USERNAME] downloaded the document "[DOCUMENT_TITLE]" from IP address [USER_IP].
Download Link Email Subject
Enter the subject line for emails that send download links to users.
- This applies when "Download Type" is set to "Send Download Link".
- Example:
Your Download Link for [DOCUMENT_TITLE]
Download Link Email Body
Enter the body text for emails that send download links to users.
- Available tags:
[NAME],[EMAIL],[DOCUMENT_TITLE],[DOWNLOAD_LINK] - Example:
Hi [NAME], thank you for your interest in [DOCUMENT_TITLE]. Click here to download: [DOWNLOAD_LINK]
Download Complete Message
Message displayed to the user after a successful download when "Download Type" is set to "Direct Download".
- Available tags:
[DOCUMENT_TITLE],[DOWNLOAD_LINK] - Example:
Thank you for downloading [DOCUMENT_TITLE]. Your download should begin shortly.
Download Complete Message (In case Download Type set to Send Download Link)
Message displayed to the user when "Download Type" is set to "Send Download Link".
- Available tags:
[DOCUMENT_TITLE] - Example:
A download link for [DOCUMENT_TITLE] has been sent to your email address.
Upload Emails
Upload Notification
Administrators receive notification email when someone uploads documents from the front-end.
- When enabled: Administrators are notified via email when users submit documents from the front-end.
- When disabled: No upload notifications are sent.
- Recommended: Enable this to moderate front-end document submissions.
Upload Notification Email Subject
Enter the subject line for upload notification emails.
- Example:
New Document Uploaded: [DOCUMENT_TITLE]
Upload Email Body
Enter the body text for upload notification emails.
- Available tags:
[USERNAME],[DOCUMENT_TITLE],[USER_IP] - Example:
User [USERNAME] uploaded a new document "[DOCUMENT_TITLE]" from IP address [USER_IP]. Please review and publish if appropriate.
Document Assignment Emails
Document Assigned Notification
The system sends notification email to a user when a document is assigned to them.
- When enabled: Users receive email notification when documents are assigned to them as owners.
- When disabled: No assignment notifications are sent.
- Recommended: Enable this to notify users when documents are shared with them.
Document Assigned Email Subject
Enter the subject line for document assignment notification emails.
- Example:
Document Assigned to You: [DOCUMENT_TITLE]
Document Assigned Email Body
Enter the body text for document assignment notification emails.
- Available tags:
[NAME],[USERNAME],[OWNER_USERNAME],[OWNER_NAME],[DOCUMENT_TITLE] - Example:
Hi [NAME], [OWNER_NAME] has assigned the document "[DOCUMENT_TITLE]" to you.
Themes
The Themes tab controls the front-end appearance and display options for Edocman pages. These settings affect how visitors see categories, documents, and upload forms.
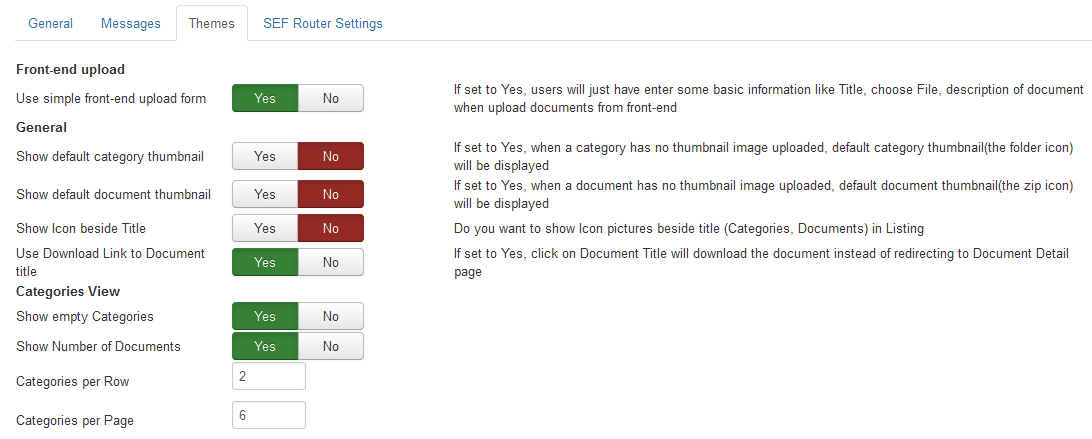
Front-end Upload
Upload Document Upload Form
Edocman supports three document upload forms for front-end submission.
- Simple form: Contains core fields only: Document Title, File Upload, and Document Description. Use this for quick, simple uploads.
- Ajax form: Allows drag-and-drop file uploads. Suitable when users need to upload multiple documents at once.
- Default form: Contains all document fields, including metadata, tags, categories, and advanced options.
- Recommended: Use Simple form for basic sites, Ajax form for power users uploading multiple files, or Default form when full metadata is required.
Show Alias Field
Display the Alias field in the Document Upload form on the front-end.
- When enabled: Users can enter a custom URL alias when uploading documents.
- When disabled: Aliases are generated automatically from the document title.
- Note: This does not apply to the Simple Upload form.
Show Thumbnail Picture Upload Field
Display the Thumbnail picture upload field in the Document Upload form on the front-end.
- When enabled: Users can upload a custom thumbnail image for their documents.
- When disabled: Default thumbnails are used.
- Note: This does not apply to the Simple Upload form.
Show Publish Status Field
Display the Publish Status field in the Document Upload form on the front-end.
- When enabled: Users can set the publish status (Published or Unpublished) when uploading documents.
- When disabled: Publish status is controlled automatically or by administrators.
- Note: This does not apply to the Simple Upload form.
Show Tags Field
Display the Tags field in the Document Upload form on the front-end.
- When enabled: Users can add tags to their documents during upload.
- When disabled: Tags must be added by administrators.
- Note: This does not apply to the Simple Upload form.
Show Meta Keyword, Description Fields
Display the Meta keyword and description fields in the Document Upload form on the front-end.
- When enabled: Users can enter SEO metadata when uploading documents.
- When disabled: Metadata must be added by administrators.
- Note: This does not apply to the Simple Upload form.
Show Select License Field
Display the Select License field in the Document Upload form on the front-end.
- When enabled: Users can select a license when uploading documents.
- When disabled: License is assigned automatically or by administrators.
- Note: This does not apply to the Simple Upload form.
Show Document Locked Field
Display the Document Locked field in the Document Upload form on the front-end.
- When enabled: Users can lock documents to prevent others from editing them.
- When disabled: Lock status must be set by administrators.
- Note: This does not apply to the Simple Upload form.
General Display
Select Theme Type
Select the theme type to match your Joomla template.
- Bright: Light theme with light background and dark text.
- Dark: Dark theme with dark background and light text.
- Recommended: Choose based on your site's design. Bright works for most sites.
Show Joomla Title
Display Joomla page titles in the browser page title of Edocman layouts.
- When enabled: Browser titles include the Joomla page title.
- When disabled: Browser titles show only the Edocman item name.
Show Default Category Thumbnail
When a category has no thumbnail image uploaded, the default category thumbnail (folder icon) is displayed.
- When enabled: Categories without custom thumbnails display a folder icon.
- When disabled: Categories without thumbnails display no image.
- Recommended: Enable this for consistent visual layout.
Show Default Document Thumbnail
When a document has no thumbnail image uploaded, the default document thumbnail (zip icon) is displayed.
- When enabled: Documents without custom thumbnails display a file icon.
- When disabled: Documents without thumbnails display no image.
- Recommended: Enable this for consistent visual layout.
Show Icon beside Title
Display icon pictures beside titles (categories and documents) in listings.
- When enabled: Thumbnails or icons appear next to category and document names.
- When disabled: Only text is displayed.
Use Download Link to Document Title
Clicking on a document title downloads the document instead of redirecting to the document detail page.
- When enabled: Document titles link directly to downloads.
- When disabled: Document titles link to the document detail page.
- Recommended: Enable this for quick-download sites. Disable this for sites where users need to read document details before downloading.
Show No Download Permission
When a user does not have permission to download a document, display a warning message.
- When enabled: Users without download permission see a warning.
- When disabled: Documents without permission are hidden or displayed without warnings.
- Recommended: Enable this to inform users why they cannot download certain documents.
Heading Text Size
Set the heading font size.
- Enter a value in pixels or em units.
- Example:
24pxor1.5em
Category Titles Size
Set the category title font size.
- Enter a value in pixels or em units.
- Example:
18pxor1.2em
Document Title Size
Set the document title font size.
- Enter a value in pixels or em units.
- Example:
16pxor1em
Activate Combo Tree for Dropdown Select List Categories
Use an enhanced dropdown with a tree structure for category selection.
- When enabled: Category dropdowns use a visual tree structure.
- When disabled: Standard dropdown lists are used.
- Note: When you have many categories, this option may slow down Edocman performance.
- Recommended: Enable this for better visual organization if you have a moderate number of categories (fewer than 100). Disable this if you have hundreds of categories.
Category View
Show Empty Categories
Display categories that do not have any documents.
- When enabled: Empty categories are shown on the front-end.
- When disabled: Categories without documents are hidden.
- Recommended: Enable this if categories are used for organizational structure. Disable this to show only categories with content.
Show Number of Documents
Display the document count beside category names.
- When enabled: Categories show the number of documents they contain.
- When disabled: Document count is not displayed.
- Recommended: Enable this to help users find popular or populated categories.
Categories per Row
Number of categories displayed per row in grid layouts.
- Example:
3displays three categories side by side. - Recommended: Use 2-4 depending on your site layout and screen size.
Categories per Page
Number of categories displayed per page.
- Example:
12 - Recommended: Balance between showing enough content and page load performance.
Number Words of Category Description to be Shown
Number of words from the category description displayed in listings.
- Enter a number, or leave zero (0) to show the full description.
- Example:
50shows the first 50 words. - Recommended: Use 20-50 words for cleaner layouts. Use 0 for detailed category listings.
Default Categories Sort Option
Select the default sorting method for categories.
- Options: Title, Created Date, Modified Date, Ordering
- Recommended: Use Ordering for manual control or Title for alphabetical listings.
Default Categories Sort Direction
Select the default sorting direction for categories.
- Options: Ascending, Descending
- Recommended: Use Ascending for alphabetical or chronological order.
Show Add Sub-category Button
Display a button to add sub-categories of the current category.
- When enabled: Users with appropriate permissions see an "Add Sub-category" button.
- When disabled: The button is not displayed.
- Note: Users must also have permission to add sub-categories.
- Recommended: Enable this for collaborative sites where users manage categories.
Sub-categories
Show Text 'Sub Categories'
Display the text "Sub Categories" above the sub-category list.
- When enabled: A heading "Sub Categories" is displayed.
- When disabled: Sub-categories are shown without a heading.
Show Sub-categories Icon
Display icons beside sub-category names.
- When enabled: Sub-categories display thumbnail icons.
- When disabled: Sub-categories display text only.
Show Sub-categories Description
Display descriptions for sub-categories.
- When enabled: Sub-category descriptions are shown.
- When disabled: Only sub-category names are displayed.
Number Sub-categories per Row
Number of sub-categories displayed per row in grid layouts.
- Example:
3 - Recommended: Match this to "Categories per Row" for consistent layout.
Category View - Documents
Documents per Page
Number of documents displayed per page in category views.
- Example:
20 - Recommended: Use 10-30 depending on document detail level and performance.
Show No Available Documents Text
Display a message when a category is empty.
- When enabled: A "No documents available" message is shown in empty categories.
- When disabled: Empty categories display no message.
- Recommended: Enable this to inform users why no documents are visible.
Default Style of Layout Default
Select the default layout style for document listings.
- Options: List, Grid
- List: Documents are displayed in rows with full details.
- Grid: Documents are displayed in a grid with thumbnails.
- Recommended: Use List for detailed document information. Use Grid for visual browsing.
Number Columns in Grid View
Number of columns displayed in grid view.
- Example:
3 - Recommended: Use 2-4 depending on screen size and document thumbnail size.
Number of Columns in Column Layout
Number of columns in column layout.
- Example:
2 - Recommended: Use 2-3 for balanced content distribution.
Show Document Detail in Popup
Display document details in a popup overlay instead of a separate page.
- When enabled: Clicking a document opens its details in a popup.
- When disabled: Clicking a document navigates to the document detail page.
- Recommended: Use popups for quick previews. Use separate pages for detailed document information.
Number Words of Description to be Shown
Number of words from the document description displayed in listings.
- Enter a number, or leave zero (0) to show the full description.
- Example:
30shows the first 30 words. - Recommended: Use 20-50 words for cleaner layouts.
Show Description in Gallery Layout
Display short descriptions of documents in gallery layout.
- When enabled: Gallery items show description text below thumbnails.
- When disabled: Gallery shows only titles and thumbnails.
Show Publish Date
Display the published date of documents.
- When enabled: Document publish dates are shown in listings.
- When disabled: Dates are not displayed.
Hide Details Button
Hide the Details button in document listings.
- When enabled: The Details button is hidden.
- When disabled: The Details button is visible.
- Recommended: Enable this when document titles already link to detail pages.
Show Sort Options
Display sorting options at the top of the documents listing page.
- When enabled: Users can change sorting criteria.
- When disabled: Documents use the default sort option only.
- Recommended: Enable this to let users customize their view.
Default Sort Option
Select the default sorting method for documents.
- Options include Title, Created Date, Modified Date, Downloads, File Size, etc.
- Recommended: Use Modified Date (Descending) to show newest documents first.
Default Sort Direction
Select the default sorting direction for documents.
- Options: Ascending, Descending
- Recommended: Use Descending for date-based sorting.
Show Bookmark Button in Documents List
Display bookmark buttons in the documents list of the Default layout.
- When enabled: Users can bookmark documents from the listing page.
- When disabled: Bookmark buttons are not shown.
- Note: This applies only to the Default layout.
Category Table Layout
Show File Type
Display the file type in table layout.
- When enabled: File extensions (PDF, DOC, ZIP, etc.) are shown.
- When disabled: File types are not displayed.
- Recommended: Enable this to help users identify file types quickly.
Show File Size
Display the file size in table layout.
- When enabled: File sizes are shown (e.g., 2.5 MB).
- When disabled: File sizes are not displayed.
- Recommended: Enable this to inform users about download size.
Show Header
Display the header row in table layout.
- When enabled: Column headings are shown.
- When disabled: No header row is displayed.
- Recommended: Enable this for clear table structure.
Show View Button
Display the View button in table layout.
- When enabled: A View button appears in the table.
- When disabled: The View button is not displayed.
- Recommended: Enable this if in-browser viewing is supported.
Show Description
Display document descriptions in table layout.
- When enabled: Descriptions are shown in the table.
- When disabled: Descriptions are not displayed.
- Recommended: Disable this for compact tables. Enable for detailed listings.
Show Thumbnail
Display document thumbnails in table layout.
- When enabled: Thumbnails are shown in the table.
- When disabled: Thumbnails are not displayed.
- Recommended: Disable this for text-focused tables. Enable for visual identification.
Show Number Downloads in the List
Display the download count in document listings.
- When enabled: Download counts are shown for each document.
- When disabled: Download counts are not displayed.
- Recommended: Enable this to show document popularity.
Document Detail View
Show Document Version
Display the document version on the detail page.
- When enabled: Version numbers are shown.
- When disabled: Versions are not displayed.
- Recommended: Enable this for documents that are frequently updated.
Show Social Sharing Buttons
Display Facebook Like, Google+, and Twitter buttons on the document detail page.
- When enabled: Social sharing buttons are displayed.
- When disabled: Social buttons are not shown.
- Recommended: Enable this for public documents that benefit from social sharing.
Show Category Name
Display the document category on the detail page.
- When enabled: The category name is shown and linked.
- When disabled: Category information is not displayed.
- Recommended: Enable this to help users navigate between related documents.
Show Bookmark Button
Display a bookmark button on the document detail page.
- When enabled: Users can bookmark the document.
- When disabled: Bookmark button is not shown.
Show Hits
Display the number of times the document detail page has been viewed.
- When enabled: Hit count is shown.
- When disabled: Hits are not displayed.
Show Number Downloaded
Display the number of times the document has been downloaded.
- When enabled: Download count is shown.
- When disabled: Downloads are not displayed.
- Recommended: Enable this to show document popularity.
Show File Name
Display the file name on the document detail page.
- When enabled: The actual file name is shown.
- When disabled: File name is not displayed.
Show File Size
Display the file size on the document detail page.
- When enabled: File size is shown (e.g., 2.5 MB).
- When disabled: File size is not displayed.
- Recommended: Enable this to inform users about download size.
Show File Type
Display the file type on the document detail page.
- When enabled: File extension is shown.
- When disabled: File type is not displayed.
Show Creation User
Display the user who created the document.
- When enabled: Creator name is shown.
- When disabled: Creator is not displayed.
Show Creation Date
Display the date the document was created.
- When enabled: Creation date is shown.
- When disabled: Creation date is not displayed.
Show Modify Date
Display the date the document was last modified.
- When enabled: Modification date is shown.
- When disabled: Modification date is not displayed.
- Recommended: Enable this to show when documents were last updated.
Show Related Documents
Display related documents on the document detail page.
- When enabled: A list of related documents is shown.
- When disabled: Related documents are not displayed.
- Recommended: Enable this to encourage further browsing.
Related Documents have same Category
Related documents share the same category as the current document.
- When enabled: Only documents in the same category are shown as related.
- When disabled: This criterion is not used.
Related Documents is the same Author
Related documents share the same author as the current document.
- When enabled: Only documents by the same author are shown as related.
- When disabled: This criterion is not used.
Related Documents in Tags
Related documents share the same tag names as the current document.
- When enabled: Documents with matching tags are shown as related.
- When disabled: This criterion is not used.
- Recommended: Enable this for tag-based content discovery.
Number Related Documents
Number of related documents displayed on the detail page.
- Example:
5 - Recommended: Use 3-10 depending on layout space.
Document Health
The Document Health tab provides settings to monitor and manage the lifecycle of documents based on their expiry dates and update history. This feature helps administrators identify documents that need attention: those that are expired, expiring soon, stale (not updated recently), or missing expiry dates.
Important: Document Health uses the Publish Down field (publish_down) to determine when a document's visibility expires. This is separate from download availability (see Download Availability section below).
Enable Document Health
Enable or disable the Document Health monitoring feature.
- When enabled: The system monitors document health status and displays badges in the documents list. Filters by health status become available.
- When disabled: No health monitoring occurs. Badges and filters related to Document Health are hidden.
- Default: Disabled (No)
- Recommended: Enable this if you need to track document expiry and lifecycle.
Expiry Warning Period
Number of days before the Publish Down date when a document is considered "Expiring Soon".
- Example:
30(documents will show "Expiring Soon" status 30 days before their Publish Down date) - Default:
30days - Recommended: Use 30-60 days to give administrators enough time to review and update documents.
Stale Document Threshold
Number of days since last modification when a document is considered "Stale" (not updated recently).
- Example:
365(documents not modified in the last year are marked as stale) - Default:
365days - Calculation: Uses the
modified_timefield, orcreated_timeif modified_time is empty. - Recommended: Use 180-365 days depending on your content update policy.
Show Documents Without Expiry Date
Controls whether documents without a Publish Down date are shown in Document Health filters and lists.
- When enabled: Documents without expiry dates appear with "No Expiry" status in lists and filters.
- When disabled: Documents without expiry dates are excluded from health monitoring.
- Recommended: Enable this if you want to review evergreen documents or identify documents that should have expiry dates set.
Automatic Action For Expired Documents
Defines what action the system plugin takes when a document expires (when current date passes the Publish Down date).
- Keep: No automatic action. Expired documents remain published. Only badges and filters reflect the expired status.
- Unpublish: Automatically set the published status to 0 (unpublished). The document becomes hidden from frontend but remains in the database.
- Archive: Automatically set the published status to 2 (archived). The document is archived but not deleted.
- Default: Keep
- Recommended: Use "Keep" unless you want automatic lifecycle management. Test thoroughly before enabling automatic actions in production.
- Safety Note: The system plugin never deletes files or database records. It only changes the
publishedfield. ACL permissions are not modified.
Document Health Status Reference
Document Health classifies documents into the following statuses, with priority from highest to lowest:
- Expired: Current date has passed the Publish Down date. The document visibility has expired.
- Expiring Soon: Current date is within the warning period before Publish Down date.
- Stale: Document has not been modified for longer than the stale threshold, but is not expired.
- No Expiry: Document has no Publish Down date set. Visibility does not expire.
- Healthy: Document has a Publish Down date, is not expired, not expiring soon, and not stale.
Important Distinction:
- Expired (Document Health) = Document visibility has expired based on
publish_down. Does NOT mean download is expired. - Download Expired (Download Availability) = File download capability has expired based on
download_available_until. Does NOT mean document visibility is expired.
Download Availability
The Download Availability tab provides settings to control when users can download document files, independent of document visibility. This allows administrators to keep a document visible on the frontend while preventing file downloads after a specific date.
Important: Download Availability uses the Download Available Until field (download_available_until) to determine when download expires. This is separate from document visibility expiry (Publish Down / publish_down).
Enable Download Availability
Enable or disable the Download Availability feature.
- When enabled: The system monitors download availability status for each document. Download expiry is enforced. Badges and filters become available.
- When disabled: Download availability is not monitored. The
download_available_untilfield is ignored. Download is controlled only by ACL and published status. - Default: Disabled (No)
- Recommended: Enable this if you need fine-grained control over when files can be downloaded, separate from document visibility.
Download Expiry Warning Period
Number of days before the Download Available Until date when a document is considered "Download Expiring Soon".
- Example:
30(downloads will show "Expiring Soon" status 30 days before the download expiry date) - Default:
30days - Recommended: Use 30-60 days to give users notice before downloads become unavailable.
When Download Is Expired
Defines what happens when the Download Available Until date has passed.
- Hide Download Button: The download button is hidden from the frontend. The document page remains visible.
- Show Message: The download button is replaced with a message explaining that the download has expired.
- Block Download: The download button remains visible but clicking it shows an error message. Direct download URLs are also blocked.
- Default: Show Message
- Recommended: Use "Show Message" to inform users clearly. Use "Block Download" if you want to enforce strict download expiry while keeping the button visible for audit/clarity.
Show Download Availability Badge on Frontend
Controls whether download availability status badges are displayed on the frontend document list and detail pages.
- When enabled: Users see badges indicating "Download Available", "Download Expiring Soon", "Download Expired", or "No Download Expiry".
- When disabled: Badges are shown only in the backend (admin documents list).
- Recommended: Enable this if you want to inform users about download availability status proactively.
Expired Download Message
Custom message displayed to users when they attempt to download a file whose download availability has expired.
- Example:
"The download for this document is no longer available. Please contact support if you need access." - Default: Standard expiry message
- Recommended: Customize this message to guide users to alternative actions (contact support, request extension, etc.).
Download Availability Status Reference
Download Availability classifies documents into the following statuses:
- Download Expired: Current date has passed the Download Available Until date. File download is no longer allowed.
- Download Expiring Soon: Current date is within the warning period before Download Available Until date.
- Download Available: Document has a Download Available Until date set, and it has not expired or entered the warning period.
- No Download Expiry: Document has no Download Available Until date set. Download does not expire (subject to ACL and published status).
Comparison: Document Visibility vs. Download Availability
| Field / Setting | Purpose | Controls | Empty/Null Value |
|---|---|---|---|
Publish Down (publish_down) |
When document visibility expires | Frontend visibility, Document Health status | No visibility expiry (evergreen document) |
Download Available Until (download_available_until) |
When file download expires | Download button, download action, Download Availability status | No download expiry (always downloadable if published and ACL allows) |
Published Status (published) |
Whether document is published | Overall availability (visibility + download) | N/A (required field: 0=unpublished, 1=published, 2=archived) |
| ACL / Access Level | Who can access/download | Permissions for viewing and downloading | Inherited from category or global |
Example Scenarios
Scenario 1: Document visible, download expired
- Publish Down: 2027-12-31
- Download Available Until: 2026-12-31
- Result: Document page is visible until end of 2027, but download button is disabled/hidden starting 2027-01-01.
Scenario 2: Document expired, download still available
- Publish Down: 2026-06-30
- Download Available Until: 2027-12-31
- Result: Document becomes hidden from frontend on 2026-07-01 (visibility expired), but if admin republishes or a direct link is used, download would still work until end of 2027.
Scenario 3: No expiry on either
- Publish Down: (empty)
- Download Available Until: (empty)
- Result: Document remains visible and downloadable indefinitely (subject to published status and ACL).
PDF Viewer Watermark
The PDF Viewer Watermark settings control the display of watermarks when users view PDF files in the online PDF viewer. This watermark is a visual overlay displayed in the browser and does not modify the original PDF file.
Important: This is separate from PDF Download Watermark. Viewer watermark is an overlay; download watermark is embedded into the downloaded file.
Enable PDF Viewer Watermark
Enable or disable watermark overlay in the PDF viewer.
- When enabled: Watermark text is displayed as an overlay when users view PDFs in the browser.
- When disabled: No watermark is shown in the PDF viewer.
- Recommended: Enable this to discourage unauthorized sharing of documents viewed online.
Watermark Text
Text to be displayed as the watermark overlay. Supports dynamic placeholders.
- Example:
"{name} - {email} - Downloaded on {datetime}" - Supported Placeholders:
{name}— User's full name{username}— User's username{email}— User's email address{user_id}— User's ID{datetime}— Current date and time{date}— Current date{time}— Current time{ip}— User's IP address{document_id}— Document ID{document_title}— Document title{filename}— Original filename{category_id}— Category ID{category_title}— Category title{site_name}— Site name
- Recommended: Include identifiable information like name, username, or email to deter unauthorized sharing.
Watermark Layout
Position and style of the watermark overlay.
- Center: Single watermark displayed in the center of each page.
- Repeated: Watermark text repeated in a grid pattern across each page.
- Recommended: Use "Repeated" for better coverage and visibility. Use "Center" for less intrusive watermarks.
Watermark Style
Visual weight/opacity of the watermark.
- Light: Very subtle, low opacity
- Normal: Moderate opacity
- Bold: High opacity
- Dark: Very dark, high opacity
- Recommended: Use "Normal" or "Bold" for good visibility without severely impacting readability.
Watermark Angle
Rotation angle of the watermark text in degrees.
- Example:
45(diagonal watermark) - Range: 0-360 degrees
- Recommended: Use 45 degrees for diagonal watermarks, or 0 for horizontal.
Watermark Opacity
Fine-tune the transparency of the watermark.
- Range: 0.05 to 0.45
- Example:
0.3 - Recommended: Use 0.2-0.3 for balance between visibility and readability.
Watermark Color
RGB color of the watermark text.
- Format:
R,G,B(e.g.,200,200,200for light gray) - Recommended: Use gray tones (e.g.,
150,150,150) for subtle watermarks, or darker colors for more prominent watermarks.
Note: PDF Viewer Watermark is applied only when viewing PDFs in the online viewer. It does not affect downloaded files unless PDF Download Watermark is also enabled.
PDF Download Watermark
The PDF Download Watermark settings control the embedding of watermarks into PDF files when users download them. Unlike the viewer watermark, this watermark is permanently added to the downloaded copy of the PDF file (the original file in the system is never modified).
Important: This feature requires the FPDI library to import existing PDF pages and overlay watermark text. See the Required PDF Libraries section below.
Enable PDF Download Watermark
Enable or disable watermark embedding in downloaded PDF files.
- When enabled: Watermark text is embedded into the PDF file during download. The downloaded file contains the watermark.
- When disabled: Downloaded PDF files are served as-is without watermark.
- Recommended: Enable this to protect PDF documents from unauthorized redistribution.
- Note: This applies only to PDF files. Other file types (DOC, DOCX, XLS, images, ZIP) are not affected.
Watermark Text
Text to be embedded in the downloaded PDF. Supports the same dynamic placeholders as PDF Viewer Watermark.
- Example:
"Downloaded by {name} ({email}) on {datetime}" - Supported Placeholders: (same as PDF Viewer Watermark section above)
- Recommended: Include user-identifiable information to trace document distribution.
Watermark Layout, Style, Angle, Opacity, Color
These settings work the same way as PDF Viewer Watermark settings, but are applied to the downloaded PDF file.
Configuration Hierarchy
Watermark configuration can be set at three levels, with the following priority:
- Document Level: Watermark settings configured for an individual document.
- Category Level: Watermark settings configured for a category (applies to all documents in that category).
- Global Level: Watermark settings configured in the component configuration (applies to all documents unless overridden).
The most specific level (document > category > global) takes precedence.
Required PDF Libraries / Dependencies
PDF Download Watermark requires the FPDI (PDF importer) library to function. FPDI allows EDocman to import existing PDF pages and overlay watermark text.
| Library | Purpose | Included? | Notes |
|---|---|---|---|
FPDI (setasign/fpdi) |
Import existing PDF pages | Yes | Located in /libraries/edocmanpdf/vendor/ as part of the EDocman package. Class: setasign\Fpdi\Fpdi |
| FPDF | Base PDF generation | Yes (via FPDI) | FPDI extends FPDF. Included as FPDI dependency. |
Installation Notes:
- FPDI is bundled with EDocman in the
/libraries/edocmanpdf/vendor/directory. - The library is autoloaded via
/libraries/edocmanpdf/vendor/autoload.php. - No additional Composer installation is required for standard EDocman installations.
- If the library is missing, check that
/libraries/edocmanpdf/folder exists and contains the vendor directory.
Developer Notes:
- The watermark process creates a temporary watermarked PDF in memory during download. The original file on disk is never modified.
- Watermarking PDF files is more CPU and memory intensive than serving the original file.
- Large PDFs (100+ pages) may take longer to process. Consider server resource limits when enabling this feature for high-traffic sites.
- Backend downloads (admin downloads) do not apply watermark. Only frontend user downloads are watermarked.
PDF Watermark Comparison
| Feature | PDF Viewer Watermark | PDF Download Watermark |
|---|---|---|
| When Applied | When viewing PDF in browser | When downloading PDF file |
| Modifies Original File | No | No (creates temporary copy) |
| User Receives Watermark | Only while viewing online | Yes, in downloaded file |
| File Types Supported | PDF only | PDF only |
| Library Required | No (uses JavaScript overlay) | Yes (FPDI library) |
| Performance Impact | Minimal | Moderate to high (depends on PDF size) |
| Permanent | No (overlay disappears when viewer closes) | Yes (embedded in downloaded file) |
Recommended Configuration:
- Enable both viewer and download watermarks for maximum protection.
- Use the same watermark text for consistency.
- Test watermark appearance with various PDF types (text, images, forms) to ensure readability.
SEF Router Setting
The SEF Router Setting tab defines how Edocman builds search-engine-friendly (SEF) URLs for categories, documents, and nested layouts. These settings affect how URLs appear in browsers and search engines.

Insert Document ID
Prepend the document ID to the document title in URLs.
- When enabled: URLs include the document ID before the document alias. Example:
/123-user-manual - When disabled: URLs use only the document alias. Example:
/user-manual - Recommended: Enable this if you have documents with duplicate names. The ID ensures unique URLs even when aliases are the same.
- Note: Changing this setting may affect existing indexed URLs in search engines.
Insert Category ID
Prepend the category ID to the category title in URLs.
- When enabled: URLs include the category ID before the category alias. Example:
/45-technical-documents - When disabled: URLs use only the category alias. Example:
/technical-documents - Recommended: Enable this if you have categories with duplicate names. The ID ensures unique URLs.
- Note: Changing this setting may affect existing indexed URLs in search engines.
Insert Category
Choose how nested category aliases are included in URLs.
- All nested categories: URLs include aliases for all parent categories. Example:
/documents/reports/financial/annual-report - Last category only: URLs include only the immediate category. Example:
/financial/annual-report - Recommended: Use all nested categories for better URL context and hierarchy. Use last category only for shorter URLs.
- Note: Longer URL paths provide more context but may be harder to remember or share.
Custom CSS
The Custom CSS tab provides a text editor for custom stylesheet rules. These styles are stored in media/com_edocman/assets/css/custom.css and apply to all front-end Edocman pages.
Why use Custom CSS?
- Customize colors, fonts, spacing, and layout without editing core Edocman files.
- Changes persist through Edocman updates.
- Safer than editing core CSS files, which may be overwritten during updates.
What can you customize?
- Category and document listing layouts
- Button styles and colors
- Font sizes and families
- Margins, padding, and spacing
- Background colors and borders
- Responsive behavior for mobile devices
Example:
/* Change document title color */
.edocman-document-title {
    color: #0066cc;
}

/* Add spacing between categories */
.edocman-category-item {
    margin-bottom: 20px;
}

/* Customize download button */
.edocman-download-btn {
    background-color: #28a745;
    border-radius: 5px;
}
Recommended: Use browser developer tools to inspect Edocman elements and identify CSS class names before adding custom rules.
AI Settings
The AI Settings tab configures built-in AI integration. These settings control the AI provider, authentication, and endpoints used for AI features within Edocman.
AI Provider
Select the AI service provider used for AI features.
- Options depend on the installed AI providers.
- Example: OpenAI, Google AI, Azure OpenAI, or custom providers.
API Key
Enter the API key for authenticating with the selected AI provider.
- Obtain this key from your AI provider account or subscription.
- Security note: Keep API keys private. Do not share them publicly or commit them to version control.
- Recommended: Store API keys securely and restrict access to authorized administrators only.
Model
Select the AI model used for processing.
- Options depend on the selected provider.
- Example:
gpt-4,gpt-3.5-turbo,gemini-pro, etc. - Recommended: Choose a model that balances performance, cost, and features.
API Endpoint
Enter the API endpoint URL for the AI service.
- This is usually provided by the AI service provider.
- Example:
https://api.openai.com/v1/for OpenAI. - Note: Use the correct endpoint for your provider and region.
TODO: Confirm the exact AI features available in Edocman from the source code. If AI features include document summarization, content generation, or automated tagging, document them here.
Download ID
The Download ID tab is used to enter your Edocman Download ID. This unique identifier links your site to your Edocman subscription and enables automatic updates through Joomla Update.
What is a Download ID?
- A unique identifier associated with your Edocman subscription or purchase.
- Required for Joomla Update to detect and install new Edocman releases.
- Provided in your customer account on the Edocman website or vendor platform.
How to obtain your Download ID:
- Log in to your Edocman account on the vendor website.
- Navigate to your subscriptions or downloads section.
- Copy the Download ID displayed for your Edocman subscription.
- Paste it into this field in the Edocman Configuration.
Why is it important?
- Without a valid Download ID, Joomla Update cannot detect new Edocman versions.
- Automatic updates keep your site secure and up-to-date with the latest features and bug fixes.
- Manual updates may be required if the Download ID is missing or invalid.
Recommended: Enter your Download ID as soon as you install Edocman. Check that updates are working by visiting Joomla Update or the Edocman Dashboard.
Troubleshooting Common Configuration Issues
This section provides solutions to common problems related to Edocman configuration.
Documents Cannot be Uploaded
Symptoms: Upload button does not work, upload fails with an error, or files are rejected.
Solutions:
- Check Documents Path: Verify the path entered in "Documents Path" exists and is an absolute server path. Wrong paths prevent uploads.
- Check Folder Permissions: Ensure the documents folder is writable by the web server. Use FTP or hosting control panel to set permissions to 755 or 775.
- Check Max Upload File Size: Verify "Max Upload File Size" in Edocman is not too low. Also check PHP limits:
upload_max_filesize,post_max_size, andmemory_limitinphp.inior hosting settings. - Check Allowed File Types: Ensure the file extension is listed in "Allowed File Types". Files with unlisted extensions are rejected.
- Check PHP Configuration: Some hosting providers restrict file uploads. Contact your host if uploads fail despite correct Edocman settings.
Documents Can be Downloaded but Not Viewed
Symptoms: Download button works, but View button does not display the document.
Solutions:
- Check Show View Button: Ensure "Show View Button" is enabled in View Document Configuration.
- Check File Extensions for Viewing: Verify the file extension is listed in "File Extensions for viewing".
- Check Browser Support: Some file types cannot be displayed natively by browsers. PDF and images usually work; office files may need Google Viewer.
- Check Google Viewer Setting: If using office files, enable "Use Google Viewer" and ensure documents are accessible by Google servers.
- Check File Access Permissions: Verify the document's Joomla access level and owner groups allow the user to view it.
- Check File Exists: Verify the file exists on the server at the expected path.
PDF Viewer Does Not Load
Symptoms: PDF files do not display in the browser, or the viewer shows an error.
Solutions:
- Check File Path and URL: Verify the file URL is correct and the file is accessible.
- Check Private/Protected Files: If the document is private or protected, Google Viewer cannot access it. Try disabling Google Viewer or enabling "Use Google Viewer with any download permissions".
- Check Browser Console: Open browser developer tools and check the console for error messages. Network errors or CORS issues may prevent loading.
- Try Disabling/Enabling Google Viewer: Test with and without Google Viewer to isolate the issue.
- Check Server Configuration: Some servers block external access to files. Check
.htaccessor server security settings.
Guests Cannot Download Documents
Symptoms: Visitors who are not logged in cannot download documents.
Solutions:
- Check Joomla Access Level: Ensure the document's access level is set to "Public" or "Guest".
- Check Document Access in Edocman: Verify the document is published and not restricted by category access or owner groups.
- Check Login to Download: If "Login to Download" is enabled, guests must log in. Disable this setting to allow guest downloads.
- Check License Agreement Settings: If "Accept License before Download" is enabled, ensure the license form is displaying correctly.
- Check Category Access: Verify the document's category is accessible to guests.
Category Page is Empty
Symptoms: Category page loads but shows no documents or categories.
Solutions:
- Check Published Documents: Ensure the category contains published documents.
- Check Show Empty Categories: If the category has no documents, enable "Show Empty Categories" in Themes settings to display it.
- Check Access Levels: Verify the documents and category have appropriate access levels for the current user.
- Check Owner Groups: If owner groups are active, ensure the current user is in the correct owner group.
- Check Document Filters: Ensure no filters or menu item settings are hiding documents from the current user.
Search Does Not Return Expected Documents
Symptoms: Search results are empty or do not include expected documents.
Solutions:
- Check Excluded Categories: Verify the document's category is not listed in "Exclude Categories" in Search Configuration.
- Check Subcategory Search Option: Enable "Search will all Sub-categories" to include subcategories in search results.
- Check Published and Accessible: Ensure documents are published and accessible to the current user.
- Rebuild Joomla Smart Search Index: If using Joomla Smart Search, rebuild the search index from Joomla Components → Smart Search → Index.
- Check Search Terms: Verify search terms match document titles, descriptions, or content.
Layout Looks Broken
Symptoms: Edocman pages are not styled correctly, buttons are misaligned, or layout is broken.
Solutions:
- Check Load Bootstrap CSS: If your template does not include Bootstrap, enable "Load Bootstrap CSS" in General Configuration.
- Check Twitter Bootstrap Version: Ensure the "Twitter Bootstrap Version" matches your template's version (2, 3, 4, or 5).
- Check Template CSS Conflicts: Some templates override Edocman styles. Use browser developer tools to identify conflicts.
- Check Custom CSS: Review custom CSS rules in the Custom CSS tab for errors or conflicts.
- Clear Cache: Clear Joomla cache and browser cache to ensure updated styles are loaded.
- Test with Default Joomla Template: Switch to a default Joomla template (Cassiopeia or Protostar) to isolate template-specific issues.